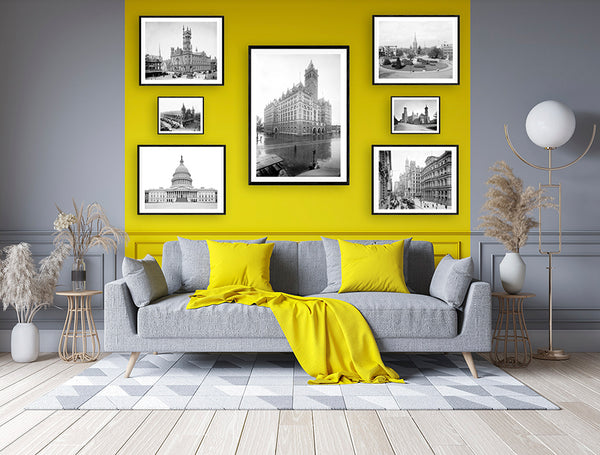
A gallery wall is a great way to fill a large wall space with multiple images to create a unique display. You can customize your gallery wall in any way you like: with multiple sizes, image orientations, and layouts. If you already have several prints you’d like to use to create a gallery wall, the best option is to lay the prints out and rearrange them until you find a layout you like. If you don’t yet have the prints to create a gallery wall, we’ll take you through the process of planning out your wall to make sure the prints you order fit your layout.
Where to create a gallery wall
Gallery walls work best on large areas of open space. A few great options are above a large couch, along a hallway, or covering an entire wall of a room. The more space you have, the more options you have. Your gallery wall can be a simple grid of same-size prints evenly spaced out across the wall, or it can be a more complicated layout of different sizes.
How to plan a layout
Getting started can be tough, especially if you aren’t entirely sure what you’d like to do. But don’t worry, we’re here to help!
Measure your space
The first step is to measure the space you’d like to fill. Measure both the width and the height. Now you’ve got something to work with and know exactly how much space you have to fill.
Find a starting point
Coming up with a layout for a gallery wall completely from scratch can be tough. We’d recommend coming up with a starting point, something you know you’d like to include or plan for. This could be knowing you’d like to have one large print in the center, surrounded by other smaller prints. It could be knowing you’d like to create an even grid and will need many images of the same size. Another option would be having a general idea of a visual design, such as alternating between vertical and horizontal images or alternating between one large print and two smaller prints stacked on top of each other.

Whatever your starting point is, this will help you figure out the rest of the layout. There’s generally a lot of trial and error when planning out a gallery wall, so don’t be afraid to go through the steps with a few different ideas before making a final decision.
Create a mockup
Before you buy your prints or put any holes in your walls, you’ll want to create a mockup of your gallery wall. Depending on your preferred methods or resources, there are several ways to do this. You could use photoshop or other digital programs to create a digital mockup. Using very gentle painter's tape you could tape out a layout to visualize it on your wall. If you prefer to sketch out your ideas, you can draw a mockup. And if you prefer an even more tactile method, you can cut out pieces of paper to move around and arrange them into a layout for your gallery wall.
Whichever method you choose, the most important thing will be getting the numbers right. You’ll need to account for leaving some space between your prints, and if you are hanging framed prints, you’ll need to be considering the final size of the frames, not just the print size. For example, if you are planning to frame your 8x10 image size print in an 11x14 frame, make sure you are factoring in the full size of that frame when planning out your wall.
When mocking up your wall, unless you make a full-scale taped mockup on the wall, you’ll need to scale down the sizes accurately.
Choosing your images
Once you have a layout planned, you’ll need to pick out your images. All of our images are offered in several different sizes, and we have an ever-growing selection of images to choose from. Whatever your theme may be, we’ve got the images to accommodate. When you find images you’d like to include in your wall, check the size options to ensure an option will fit into your layout. Alternatively, you can use our search function to see all images available in a particular size. For example, here's a sample search for images available as 11x14 prints.
As mentioned before, creating a gallery wall involves plenty of trial and error. If you get stuck, can’t find an image in the size you need, or find an image you want but didn’t plan for any of its size options, don’t be afraid to rearrange until you get it right!
There are plenty of theme options for your gallery wall, or you could skip the idea of a theme and just choose images you like and think go well together. There are no rules here! If you need some inspiration, you can browse our curated collections.

Hanging your gallery wall
When it comes to hanging a gallery wall, measure three times, and hammer in a nail once! Save yourself a headache, and take plenty of extra time to plan everything out. If you’ve got the space, it can be very helpful to lay out everything you have, in order and spaced out how to want it, so you don’t lose track of the plan.
You’ll need to make sure you have hanging hardware that can support the weight of your prints, whether they are framed paper prints or stretched canvases. When in doubt, overestimate. There’s no downside to using hardware rated to handle more weight than your print, but if you use hardware that isn’t strong enough you may end up with a print falling to the floor, creating a bigger hole in your wall.
To know where to hang your hardware on the wall, you need to know where the hanging wire on the back of your print will be when the print is at the height you want it to be. Pull the hanging wire up toward the top of the print/frame, and measure the distance between the wire and the top. For this example, we’ll say it’s 3”. Then, on your wall, from the point that you want the top of the print/frame to be, measure down 3”. This is where your hanging hardware will need to be.
Sample Layouts
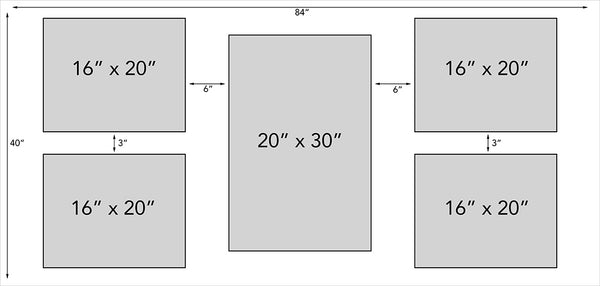
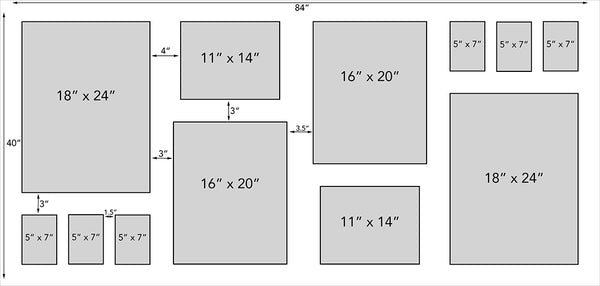
If you’re having trouble getting started, here are a few ideas to get the creative juices flowing.


